'There's ur-gold here... I can smell it,' said the Zangrom, peering over the blades of his axe as he stared over at the crumbling ruins just outside of the Hrukvorn encampment.
'Ruadhar wants the area mapped,' replied the Grungondi karl as he polished his magmapike. 'Nothing more, nothing less.'
'Isn't it out duty to reclaim the fragments of Grimnir wherever we know they are? You should know that better than any of us, temple guard.'
'My duty, grimwrath, is to obey the Runemaster of the Hrukvorn lodge,' replied the karl curtly. 'But if you will insist upon charging into unknown territory to sate you gold-lust, what choice will I have but to follow you? Grimnir help us, you are in charge of this mission.'
'Looks like we won't have a choice in the matter,' said Ulli, smiling darkly. 'Looks like my skeletal friend has come to make good on his threat.'
At the fire side of the ruins, the wight king could be seen pointing and shouting orders at his minions, a pitiful zombie shambling along at his side.
'He's got more of those... creatures with him...' said one of the vulkites who had come over to look.
'Creatures or nay, brothers, do you not feel the power of our god coursing through yours veins?' growled Ulli as he turned to address the fyreslayers under his command. 'I do. It cries out for gold! For glory! For the corpses of our foes cast down at our feet, cleaved in twain by the axes of our ancestors!'
The fyreslayers roared and cheered as Ulli paced back and forth before them, thick cords of muscle around his neck tightening as adrenaline and ur-gold intermingled in his blood.
'Who can stand before the cleansing power of fire? We are the anger of earth made manifest! We are Grimnir!
'KHAZUK!'
For the second part of our Skirmish series, Josh and myself would be playing Treasure Hunt from the newly published Age of Sigmar supplement. Playing again on a 4' x 4' table, we each deployed our entire force in a 12" x 12" corner of the board diagonally opposite one another. Five tokens were set up in the centre of the board as shown on page 23. Having finished deploying first, Josh decided to go first.
Note - As mentioned in my previous post, I realised upon writing that my own band was overpointed and will endeavour in future to ensure this doesn't happen again. I hope you still enjoy this post as a demonstration of the battleplan and Skirmish as a game mode.
Death: Turn 1
Wasting no time at all, Josh's dire wolves immediately rush towards the centre and top-centre artefacts, whilst the rest of his army slowly advanced behind them.
Josh now had the opportunity to search through two of the hoard piles for an artefact, but was unable to recover anything.
Order: Turn 1
I opted to rush forward with all of my fyreslayers towards the bottom-centre hoard pile, pushing my grimwrath and hearthguard to the fore to allow me to advance on the centre if needed.
I managed to get one hearthguard within 3" of this hoard, allowing me to search for an artefact. I also was unable to find anything this turn!
Priority
Josh (Death) won the priority roll for this turn and naturally chose to take the first turn in the next battle round.
Death: Turn 2
Josh continued his push to the centre ground, this time having some of his wolves circle around to the centre-right hoard. Unfortunately, one of his wolves started the turn a bit too close to a realmgate and was zapped for 1 wound.
Josh was able to search 3 hoards this turn, and managed to find 1 artefact in the dead centre of the board!
The rotting canids raked frantically at the ground, scrambling over one another in their desperation to get at whatever it was lay beneath the rancid ground. Running at the head of the fyrd, Ulli gritted his teeth and his knuckles turned white as he envisioned his axe bisecting the creatures before him. His grip slackened and his eyes widened as one of the beasts hauled from below the ground a circlet of gold, the morning sun flashing brilliantly off of its shining surface.
The Zangrom cackled wildly, his eyes ablaze with the power of the duardin warrior god.
'They bring us treasure from Grimnir, warriors of the Hrukvorn!' roared Ulli. 'Let us thank them!'
Order: Turn 2
My fyreslayers continued rushing towards the centre. With the newly revealed artefact, and the choke point between the two ruins either side, I decided to commit my warriors to a full-blown clash in the centre of the battlefield.
I was unable again to find an artefact in the bottom-centre horde, and meanwhile had my auric hearthguard (who I had decided would remain near the bottom-centre horde) pepper the dire wolves with molten rock bolts.
Priority
I managed to win the roll-off this time, and took priority.
Order: Turn 3
The grimwrath charged into the dire wolves at the centre, alongside his trusty hearthguard and a few of the vulkites. The grimwrath himself was wholly underwhelming here, failing to kill a single wolf. It is worth noting, however, that the dire wolves were doing phenomenally well with their saves, too.
However, the combined charge of the vulkites and the hearthguard proves too much for the dire wolves to withstand, and they slay the dogs to claim the centre artefact.
Still no artefact found at the bottom-centre hoard.
Death: Turn 3
Josh runs one of his dire wolves over to the centre-left hoard in this turn in a bid to maximise his chances of finding another artefact, taking care to make sure the wolf remains outwith the 3" of the Cursed ruin (which has a chance to inflict mortal wounds on him). Despite having models within range of 3 of the remaining 4 hoards, nothing turns up.
Elsewhere, the wight king and his entourage finally arrive in the centre of the fray. More dire wolves circle around behind the fyreslayers.
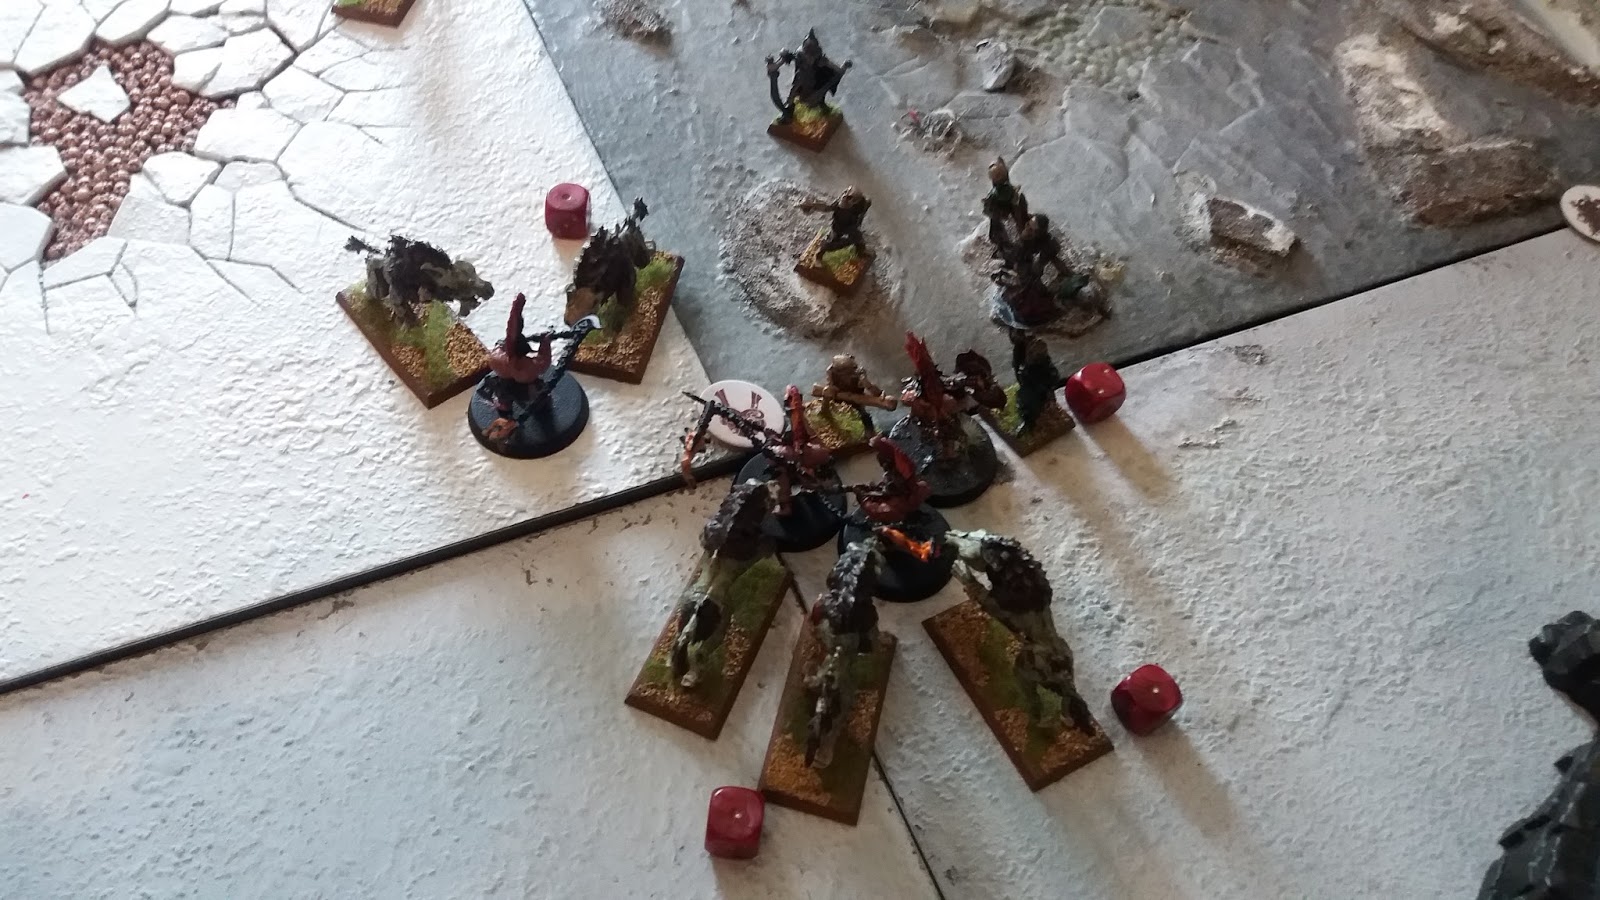
Just as Ulli bent down to retrieve the circlet laying in the earth, the hearthguard readied their poleaxes, whirling the braziers and shifting their stances in anticipation. Up ahead, the wight king strode forward, dark energy coalescing about him wherever he went. His hounds ran before him, howling and barking with all the savagery of living hunting hounds. The undead king drew his dark blade with a his and struck it against his shield in challenge.
The wight broke into a charge, rushing straight for Ulli and his fyrd, and Ulli answered in turn.
With a bestial roar, the Zangrom leaped into the air, his axe whirling about him and leaving fiery contrails in the air wherever it went. The wight drew close, and the axe came down. He brought up his shield to block, but underestimated the force of the blow, which knocked the shield down and crashed into the king's shoulder and brought him to his knees. Ulli landed ungracefully on his knees and the wight king stood back to his full height, his armour rent, his shield battered, and his bones broken. With a bass growl, Ulli leapt at the wight king once more with renewed fury, swinging his axe wildly at his foe. With dexterity that belied his appearance, the dead monarch, deftly blocked and parried the Zangrom's blows.
Ulli's breath came in heavy rasps as he sought to recover from the flurry of blows he had delivered. As he heaved his axe up into an attacking stance once more, the wight king brought his black blade down upon the fyreslayer, he quickly blocked the blow with the haft of his weapon. The wight swung his shield around and clattered it off of the Zangrom's body, leaving little more than a bruise where the blow had landed.
The two combatants staggered back to their feet and began circling one another again - the wight king cold and expressionless, the grimwrath grinning maniacally.
The wight king grossly under-performed here and whiffed all of his attacks, much to Josh's dismay (understandable considering how much of a powerhouse he was in the last game). My general managed to inflict a mighty 4 damage upon him, even with his 4+ save after rend and his 6+ death save. Despite managing to do so much damage, and weather so much myself, Josh was firmly in control of the centre ground at this stage with his superior numbers.
Priority
Once again, I won the priority roll and seized upon the opportunity to take the first turn of the round.
Order: Turn 4
Here I had the remaining hearthguard and vulkites charge into the centre. The combined shooting of the fyresteel throwing axes and the magmapikes did little damage, but I did manage to pick off at least 1 or 2 wolves. The slingshields managed to pick up a wound here and there too. But it was the combined killing power of the grimwrath and the hearthguard that slew the wight king and the remainder of his minions in the centre.
Having lost their general, the remaining members of the undead warband were reduced to Bravery 5 and were at the mercy of battleshock. 4 models in total were lost to battleshock, leaving 2 models in total in Josh's warband.
Death: Turn 4
In a last ditch effort, Josh had each of his remaining models search a hoard, but to no avail.
Result: Order Major Victory
Ulli spat upon the smoking ruins of the wight king's skull, having sent his soul howling back to Shyish. He returned his attention to the circlet the hounds had dug up, which the hearthguard were admiring amongst themselves, and greedily snatched it from the hands of the karl.
He held it up to the light, giddly watching the rays of the dim sun playing along its contours.
The Zangrom smirked.
'Ur-gold,' he said.
Summary
I felt that I was truly able to take advantage of my warband's synergies in this game where I hadn't in Clash at Dawn due to the random deployment. This is one of the single most enjoyable battleplans I've played in Age of Sigmar let alone Skirmish. I really liked the risk-reward dichotomy - not knowing where and when an artefact could appear makes for an interesting game. I was quite fortunate that nothing appeared in Josh's half of the board, and this again underpins to me that I could perhaps use a few cavalry or flying units to extend my reach as and when needed. Treasure Hunt is an excellent battleplan to play if you like having to alter your strategy on the fly. Josh and I have even discussed the possibility of altering it for use in the mega battles we like to organise every so often.
On another note, it was nice to finally see the grimwrath come into his own. I've used him in a few games of varying sizes now and I was always a bit underwhelmed by him. He definitely seems very well suited to skirmish.
Showing posts with label challenge. Show all posts
Monday, 29 May 2017
The Order of the Fiery Gate - Battle Report: Clash at Dawn
Though darkness concealed much of the horrors of Mount Dextrous from sight, the stink of the Questing Reek still assailed the senses. Ulli Zangrom - grimwrath of the Hrukvorn lodge - grimaced as he peered into the darkness and could only make out but a handful of the scouting party he had been given command of.
'We're spread too thin...' whispered one of the hearthguard at the Zangrom's side. 'If we were to be ambushed here...'
'Words are wind, flameling,' said Ulli in response. 'Keep those sorts of helpful observation to yourself.'
The Zangrom cursed as he peered into the distance and could vaguely make out the glowing brazier from the vulkite karl's warpick disappear amongst a copse of dead trees. Just as he turned to speak to the fyreslayers following at his heels, a baleful, rasping howl filled the dead, pre-dawn air and was quickly followed by a chorus of hoarse barking. From within the ruins up ahead, a dim and unnatural light began to glow.
'The dead are waking,' said the grimwrath, tightening his grip around the haft of his fyrestorm axe. 'Make for the woods. Those idiots are as good as dead if we don't get there in time.'
Having recently procured a copy of the new Skirmish book for Age of Sigmar, my friend Josh agreed to play a couple of games both to help me out as part of the campaign, and also out of personal interest as a long time fan of Mordheim and other similar systems. As the objective states that two linked games of Skirmish are required, it seemed fairly sensible to give the Shadespire campaign a whirl. With Josh playing Death and myself playing the Fyreslayers, we set about playing Clash of Dawn.
Note - At the time of writing I realised that I had miscalculated my points and had a few more models on the field than I should have. This is something I will address for future games, of course! In the mean time, I hope you all still find these reports beneficial in some capacity - even if it is just as a demonstration of how Skirmish works!
For those who have not yet played, this scenario requires that the table (a 4' x 4' is recommended) be split into four quarters, numbered 1-4. During deployment, a dice is rolled for each individual model. The result determines which quarter they must be deployed in, with results of a 5 or 6 allowing the player to choose placement. The usual restriction of remaining 9" away from the enemy applies.
Fortunately, I was lucky enough to keep my Vulkites together, and the ended up in the forest deployed thusly:
I was not so fortunate with the majority of my hearthguard and my general, who ended up scattered throughout the various corners of the board.
Josh's grave guard and wight king ended up staring them down on the other side like this (you can just about make out the woods in the bottom left of the picture):
Josh's warband included a number of dire wolves which ended up scattered throughout the board, in addition to a few more grave guard he deployed inside buildings. It became immediately apparent where the bulk of the action would take place, however!
Josh finished deploying first, and so took priority for the first turn.
Death: Turn 1
The wight king activated his Merciless Killer trait, adding +1 to wound to himself and friendly units within 6". Elsewhere on the board, the dire wolves and remaining grave guard began converging upon the berzerkers within the forest.
As expected, the Wight King and his band of undead miscreants immediately began slaying the defiant duardin:
As I recall, 2 fyreslayers were downed in this confrontation, meaning Josh only needed to kill 8 more to win. The vulkites performed rather underwhelmingly here, but did manage to remove a dire wolf and a grave guard or two:
Nevertheless, the held their ground in the battleshock phase.
Order: Turn 1
Having pinned the wight king and his bodyguard in combat, I sought to bring Josh's army down the my auric hearthguard's respectable shooting. The other nearby pike-wielding fyreslayers advanced as far as they could to ensure they were well within the required 12" as shooting was curtailed in this turn by the pre-dawn darkness. Elsewhere, my stranded hearthguard and general began the slow trudge to the fray:
The auric hearthguard loosed their molten rockbolts into the undead, only slaying the grave guard standard bearer after he soaked up 4 of the 6 shots hurled at him.
Another vicious round of combat sees the forest once again grow emptier:
The wight king - who already has a phenomenal 3+ save - was utterly immovable in the forest which granted him a 2+ save. Though most of his warriors - excluding one surprisingly agile zombie! - were vanquished, he fought defiantly on, cleaving into the fyreslayers with ease.
Priority
I won the priority roll and so took the first turn in the next round.
Order: Turn 2
Here I attempted to charge my general and accompanying hearthguard at the dire wolves making their way into the vulkite flank. The grimwrath failed his charge, but his two hearthguard rushed headlong at the undead hounds:
I managed to kill the last of Josh's grave guard in this turn, and I did shave off a wound here and there on his dire wolves, but they were proving a menace to deal with in this game being 2 wounds a piece and surprisingly numerous for something so tough and agile. My vulkites failed to wound the wight king once again.
Death: Turn 2
The remainder of Josh's dire wolves charged into the fight to set about my vulkites. My hearthguard karl killed the wounded dire wolf in the centre of the field meaning that I had vanquished a sufficient number of Josh's warband to claim victory!
But another dire wolf killed him back!
Result: Draw
'Fall back, you idiots!' barked Ulli at his warriors as the dragged their wounded brethren from the field.
The wight king - protected by his rotting pack of dogs - also appeared to be quitting the field. The creature glared across the ruins at the Zangrom and pointed his dark blade directly at him before defiantly drawing it across where his throat would once have been. He even seemed to throw back his head and cackle silently at the gesture.
Ulli glowered back at the undead warrior, cracking his knuckles one by one as he did so.
Summary
Having played The Lord of the Rings: Strategy Battle Game a few times, I felt that this was very similar - especially as Age of Sigmar also uses the similar Priority system. Skirmish also has me excited at the prospect of using some units and characters that ordinarily I perhaps would not have an application or use for in larger games and I will most certainly be looking into perhaps adding some faster units like Skywardens or Wild Riders for grabbing objectives and such.
This particular battleplan makes for a very short game. I also felt at quite a disadvantage as a Fyreslayer player here - I am quite reliant on synergies to make my army work, and the mediocre movement stats of my pure infantry warband meant that recovering from the random deployment was quite difficult.
On the other hand, Josh's very mobile army was able to recover very easily in this scenario and has me considering adding some sort of equivalent unit to my own warband. He very easily circumvented the random deployment issue and was able to quickly converge on the area where the bulk of the combat took place. At 2 renown per model, dire wolves are an absolute steal for what they can do in Skirmish games.
Clash at Dawn definitely underpins the need for versatility in a Skirmish warband, and it is definitely something I will have to consider going forward - particularly as I am in the habit of wanting to field as many fyreslayers as possible!
Labels:
age of sigmar,
aos,
battle,
battle report,
build,
campaign,
challenge,
deadwalkers,
death,
deathrattle,
duardin,
fyreslayers,
games workshop,
monthly,
narrative,
objective,
order,
skirmish
Tuesday, 16 May 2017
May Monthly objective
Hi Guys sorry its a late monthly objective, but its a nice easy one this month anyway! So everyone should have a small little warband painted up now and now is the time to start your games and campaign in the Mortal Realms!
This month your objective is to play 2 linked games of Hinterlands or AoS Skirmish (should it drop in time), by linked games I mean, just continue the story or campaign over into the second game.
If you complete this objective you will receive 4 bonus tiles!
Also if you are new or haven't posted yet... get a blog post up and you'll gain an automatic 5 tiles!
Good luck everyone. Loving the progress so far
Sunday, 30 April 2017
The Order of the Fiery Gate - The Grongundi
Ruadhar slammed his staff impatiently into the ground as the gate of the newly captured fortress was reduced to so much kindling. A trio of gargants shambled into the keep, swinging improvised weapons consisting of pillars of stone and tree trunks about them with wild abandon. The fyreslayers' seraphon allies plunged in to meet this new threat head-on, whilst the lodge's fighters fought the assailing greenskins at the breach on the western wall.
'What are you doing back here?' growled Ruadhar to the battered and bloodied Ironwarden staggering up the ramp towards the Runemaster.
Labels:
age of sigmar,
aos,
build,
campaign,
challenge,
duardin,
dwarfs,
fyreslayers,
games workshop,
monthly,
objective,
order,
paint,
warhammer
Wednesday, 5 April 2017
Current Standings! and April Monthly Objective
Congratulations on all those who completed the monthly objective for March, you have now entered Mount Dextros region which is where the real campaign is taking place.
For those who haven't yet gained tiles here, don't worry you will have another chance to this month. For those who have, you now have a choice to make.
But let us see who is winning in what area at the moment. First of all the Overview map looks like this..
For those who haven't yet gained tiles here, don't worry you will have another chance to this month. For those who have, you now have a choice to make.
But let us see who is winning in what area at the moment. First of all the Overview map looks like this..
Friday, 17 March 2017
Captain Barnabus Tar'qun and the crew of the Aether-Walker
A roll of thunder echoed through the sky, a flash of lightning illuminating the deck of the mighty floating vessel as it cut through billowing dark clouds. From amid a porthole embedded in the hull of the ship Captain Barnabus Tar'qun peered out at the moody weather. The captain was a stout man of many years with a rugged face, framed by a wiry grey beard and piercing green eyes behind half moon spectacles. His visage was streaked with wrinkled lines that spoke of years of hard labour on the decks of airships and fighting tooth and nail for other men. His eyes however still held a delightful glint that gave the impression of a youthful soul trapped in an older frame. The stub of a well chewed cigar jutted from the corner of his lips, ash cascading down his facial hair as he leaned back into his brass rocking chair.
The ship he resided on was known as 'Aether-Walker' and was the pride of the fleet. Its ornate shape had been designed to perfectly traverse the turbulent winds, fickle weather and aether-rot that had claimed so many lesser constructs. Barnabus had full faith in the machines capabilities, however his over protective nature of the creation was justified for the kings ransom he had paid ( and still owed) to its previous owner. The 'Aether-Walker' was the first ship that he had been in command of and had been funded by the Sky port council of Tel'ra Da, on the merit of his experience as a navigator. The pursuit of Aether-Gold had always been a harsh focus for the Kharadron, however in recent times they had been forced to travel further afield to find suitable deposits. Barnabus had theorised in a recent journal the existence of an accumulating mass across the stained sea that yet remained untapped. It was this that had allowed him the chance to captain his own fleet in search of this potential anomaly.
The acrid blue smoke of the cigar pooled around his balding pate as he flipped open his leather bound log book and stubbed the chewed end into an ash tray. From the inkwell of his bureau he produced a metallic quill, dipped it in ink and began to scrawl runes on the pages. As he worked, recording the coordinates of the location, the weather and other such trivial things the day had brought he thought on the strange phenomenons he was encountering as he drew ever closer to his destination. The weather seemed to become more animated the closer to they came to the anomalies location. It had struck him as peculiar that a storm could be apparent, this high within cloud cover, however the higher they ascended the thicker the clouds had become. It had become increasingly difficult to work out their location from vision alone as the intermittent storms brought thick clouds and fog to surround the ship. He pondered the correlation of this with his anomaly theory for a few moments before being jarred from his deep thoughts by a heavy impact that sent him reeling to the deck.
Startled voices could be heard from all over the vessel as a great horn was blown, warning the crew of immediate danger. Instinctively he dived for his Aether-Suit and began the difficult process of sliding into his life preserving armour. With shaky hands he pulled clasps tight, checked seals and released the valves that allowed the air to be filtered and fed to him within his metal cocoon.
The suit was an ornate display of his kin's craftsmanship. Each one had been forged with an individual in mind and would fit no other. It was the Kharadron's pride and joy and was as revered as any holy icon.
When the safety checks on his armour were complete, Barnabus reached for the valve door in the ceiling, unsealed the hissing quarantine locks and heaved himself on deck to face the commotion.
Wednesday, 15 March 2017
And the world wept...
He woke and he looked and he saw what he was. The power that raged in his veins, a gift. No, the gift, the gift of protection. He raised his head and the new born daemon prince howled his joy at the uncaring sky.
Blood for the blood god, skulls for the skull throne!
And the world wept for what it had lost and gained...
So this is my 'general', at least my fluff general :) The great Daemon Prince of Khorne - Ca'vren Kal'b. Disciple of Khorne and protector of The Faithful. He has been blessed by Khorne with unimaginable power far beyond the reach of a mortal. He leads his band on a mission of vengeance, aiming to right old wrongs done to his people.
Tuesday, 7 March 2017
Battle Report: Groin Kikka's WAAAGH! vs. Scott Antos' Stormcast Eternals
Scott Antos and I (Samurai_Eduh) had a battle last night! We are both relatively new to the game, having played 40k for many years. This campaign seemed like a great opportunity to seriously get into AoS!
This is my first battle report, so there are many details left out. We know for next time to take much better notes! Without further ado...
Mission: Border War, 1560 pts. (4 objectives. These are the bulls eyes on the map).
Here are our armies:
Scott:
Lord Castellant (LC1)
Lord Celestant on Dracoth (LC2)
Lord Relictor (LR)
Gryph Hound (GH)
5x Liberators (L1)
5x Liberators (L2)
10x Liberators (L3)
2x Fulminators (F)
5x Judicators (J)
5x Retributors (R)
3x Prosecutors (P)
Lord Castellant (LC1)
Lord Celestant on Dracoth (LC2)
Lord Relictor (LR)
Gryph Hound (GH)
5x Liberators (L1)
5x Liberators (L2)
10x Liberators (L3)
2x Fulminators (F)
5x Judicators (J)
5x Retributors (R)
3x Prosecutors (P)
Samurai_Eduh:
Megaboss on Maw-Krusha (MoM)
Warchanter (W)
5x Brutes with Gore Hackas (B1)
5x Brutes with Dual Choppas (B2)
10x 'Ard Boyz (AB)
3x Gore Gruntas (GG)
Megaboss on Maw-Krusha (MoM)
Warchanter (W)
5x Brutes with Gore Hackas (B1)
5x Brutes with Dual Choppas (B2)
10x 'Ard Boyz (AB)
3x Gore Gruntas (GG)
Eduh won roll off for turn, elected to go second.
Pic is of our deployment.
SCOTT TURN 1:
Everything moves forward. Scott tries to shoot at B2 with his Judicators, but caused no wounds.
He captures the North and West objectives and scores 3 points.
EDUH TURN 1:
Due to ridiculous 2d6 Destruction Allegiance moves, B1 and B2 are able to make it into combat with R and wipe them out.
AB moves up into the ruins.
GG moves towards and captures the East Objective.
War chanter Captures South Objective.
End of turn Eduh scores 3 points.
Score: Scott 3, Ed 3.
AB moves up into the ruins.
GG moves towards and captures the East Objective.
War chanter Captures South Objective.
End of turn Eduh scores 3 points.
Score: Scott 3, Ed 3.
EDUH TURN 2: DOUBLE TURN!
Eduh wins initiative! Double Turn!
Using Destruction move, AB makes a skirmish line in front of L1, L2 and F. They manage to charge all three units!
GG uses the Destruction move to move behind ruins and make the charge into the Judicators!
The MoM mkaes a flanking move on L3. He charges in causing 5 mortal wounds with his charge attack and kills several Liberators with his regular attacks!
B2 charges the Prosecutors and kills 2.
B1 drags the Lord Celestant into combat as he was within 3". They do a few wounds to each other.
L3 also does a few wounds to B1 as they were also within 3".
Eduh scores 3 points.
SCORE: Scott 3, Ed 6.
SCOTT TURN 2:
LC1 charges AB
Between LC1, L1, L2, and R, AB is destroyed.
P and B2 fight it out and the combat ends with only 1 Prosecutor remaining.
LC2 and B1 do some wounds to each other.
MoM kills a few more Liberators from L3.
GG manages to kill a few Judicators from J.
Scott Scores 3 points.
SCORE: Scott 6, Eduh 6.
Between LC1, L1, L2, and R, AB is destroyed.
P and B2 fight it out and the combat ends with only 1 Prosecutor remaining.
LC2 and B1 do some wounds to each other.
MoM kills a few more Liberators from L3.
GG manages to kill a few Judicators from J.
Scott Scores 3 points.
SCORE: Scott 6, Eduh 6.
EDUH TURN 3 (Details Sketchy at this point)
MoM beats up a few more Liberators from L3.
B1 and LC2 fight on. Lord Celestant down to 1 wound. Only 1 survivor from B1 remains.
B2 kills the remaining Prosecutors from P.
The GG and J slap fest continues, with Scott down to two Judicators.
Ed scores 3 points.
SCORE: Scott 6, Ed 9
MoM beats up a few more Liberators from L3.
B1 and LC2 fight on. Lord Celestant down to 1 wound. Only 1 survivor from B1 remains.
B2 kills the remaining Prosecutors from P.
The GG and J slap fest continues, with Scott down to two Judicators.
Ed scores 3 points.
SCORE: Scott 6, Ed 9
SCOTT TURN 3:
L2 charges GG.
LC1 Charges GG.
F sweeps South and charges W. W somehow survives.
GH and the survivor of L1 sweep down and captures East objective.
MoM finishes off L3 and captures West objective.
LR charges into B2.
Scott scores 3 points.
SCORE: Scott 9, Eduh 9.
LC1 Charges GG.
F sweeps South and charges W. W somehow survives.
GH and the survivor of L1 sweep down and captures East objective.
MoM finishes off L3 and captures West objective.
LR charges into B2.
Scott scores 3 points.
SCORE: Scott 9, Eduh 9.
EDUH TURN 4:
MoM sweeps south in order to intercept F before they capture Eduh's home objective.
B1 kills the Lord Celestant.
Warchanter survives the Fulminator's attacks again!
The Gore Gruntas continue to somehow survive against the Lord Castellant and the Liberators from L2.
The Lord Relictor must be wearing power armor, as he survives against three Brutes on his own.
The last Judicator dies from the Gore Gruntas hooves and Jaws.
Eduh Scores 3 points.
SCORE: Scott 9, Ed 12.
SCOTT TURN 4:
Scott's dice are cursed. Someone call the exorcist!
Nothing much happens but the Gryph hound moves towards the southern objective.
The Lord Castellant and the Liberators take the Gore Gruntas down to one model!
The Fulminators kill the Warchanter (finally).
Scott scores 3 points.
SCORE: Scott 12, Eduh 12.
Nothing much happens but the Gryph hound moves towards the southern objective.
The Lord Castellant and the Liberators take the Gore Gruntas down to one model!
The Fulminators kill the Warchanter (finally).
Scott scores 3 points.
SCORE: Scott 12, Eduh 12.
EDUH TURN 5:
The MoM literally screams the Gryph Hound to death, before charging into the Fulminators and grinding them into the mud.
B1 charges into L2 to keep them pinned in combat.
B2 retreats from combat with the Lord Relictor (unlike Propa Orks) to make a dash to the Northern Objective and are able to claim it!
Eduh scores seven points!
Scott calls the game.
FINAL SCORE: Scott 12, Ed 19.
B1 charges into L2 to keep them pinned in combat.
B2 retreats from combat with the Lord Relictor (unlike Propa Orks) to make a dash to the Northern Objective and are able to claim it!
Eduh scores seven points!
Scott calls the game.
FINAL SCORE: Scott 12, Ed 19.
A great time was had by both players!
March Bonus Objective
Welcome to the first monthly objective!
March Objective!
Good Day everyone!
Welcome to Border Wars, an online Age of Sigmar map campaign run by HobbyHammer. A few have started introducing their armies which is great! So I thought now is a great time to put down a monthly objective.
This month is easy, paint up your General of your warband and post some pictures up on here with a back story as to why he is campaigning. If you complete this by the 28th March you will gain an extra 2 tiles of territory and also start expanding into Mount Dextros which currently has no one in it.
If you would like to see the territory your army has gained so far then head over to http://www.theriseofempires.com and keep track of them on the map.
Subscribe to:
Posts (Atom)